To remove pin nails from wood, use a pair of pliers or nail puller to gently pry them out. Then fill in the holes with putty or wood filler for a seamless finish.
Introduction (120 words): Pin nails are small, slender nails commonly used in woodworking projects to securely hold pieces of wood together. However, when it comes to disassembling or refinishing the wood, removing these tiny pins can be a daunting task. Luckily, with the right tools and techniques, you can easily remove pin nails from wood without causing any damage.
We will explore a simple and effective method for removing pin nails from wood, ensuring a smooth and pristine surface. Whether you are a DIY enthusiast or a professional woodworker, mastering this skill will come in handy during various woodworking projects. So, let’s delve into the details of how to remove pin nails from wood with ease and precision.
Understanding Pin Nails And Their Uses
Pin nails are small, thin nails that are commonly used in woodworking projects for their minimal visibility and ability to secure delicate pieces of wood without causing damage. These nails are usually 23-gauge in size, making them even finer than brad nails.
One of the common applications of pin nails in woodworking is for attaching delicate trim and moldings. The small size of these nails allows them to be easily concealed and minimizes the risk of splitting or damaging the wood. Additionally, pin nails are often used in furniture construction, especially for securing small wooden components like drawer bottoms and back panels.
When it comes to removing pin nails from wood, it’s essential to use the right tools and techniques to avoid any damage to the wood surface. One effective method is to use a pin nail punch, which is designed specifically for this purpose. By placing the punch on the head of the nail and using a hammer to strike it, the pin nail can be easily pushed below the wood surface without leaving any visible marks.
Overall, understanding pin nails and their uses is crucial for any woodworker. Knowing when and how to use them properly can ensure a seamless and high-quality finish in woodworking projects.
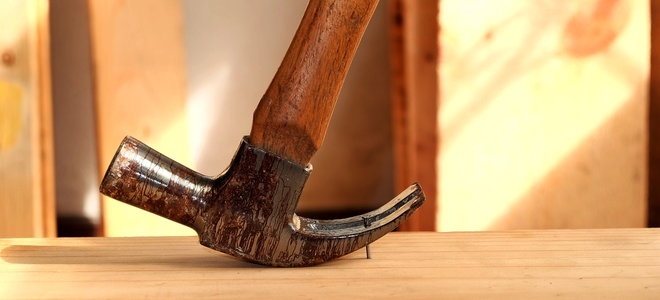
Credit: www.doityourself.com
Tools And Materials Needed For Pin Nail Removal
In order to remove pin nails from wood, you will need a few essential tools and some safety equipment to ensure a successful and safe removal process.
| Fine-tipped needle nose pliers | A small nail punch | Hammer | An awl or a small chisel |
| Wire cutters | Flathead screwdriver | Coping saw or a small handsaw | A pry bar or a claw hammer |
- Safety goggles or glasses
- Gloves to protect your hands
- Dust mask to prevent inhalation of wood particles
- Ear protection to reduce noise exposure
By having these essential tools and safety equipment ready, you can efficiently and safely remove pin nails from wood without causing damage to the material or risking any injuries to yourself.
Step 1: Preparation
Before removing pin nails from wood, it’s important to inspect the surface carefully. Look for any small holes or marks that indicate the presence of pin nails. Use your fingers or a soft cloth to gently run over the surface and feel for any raised areas where the pin nails might be.
Once you have identified the pin nails, gather the necessary tools and materials for their removal. You will need a pair of needle-nose pliers, a small hammer, a thin piece of scrap wood, and a putty knife. Additionally, it is recommended to have a good light source and safety goggles to protect your eyes.
| Tools | Materials |
|---|---|
| Needle-nose pliers | Thin piece of scrap wood |
| Small hammer | Putty knife |
| Light source | |
| Safety goggles |
Having the right tools and materials ready will make the process of removing pin nails from wood much easier and efficient.
Step 2: Loosening The Pin Nails
In step 2 of removing pin nails from wood, you will need to use a pin nail punch. The purpose of the pin nail punch is to tap lightly on the nail head, loosening it without causing any damage to the wood. It is important to be gentle and precise when using the pin nail punch to ensure the nail head is loosened properly. Take care not to tap too hard as this can damage the surrounding wood. By following this step, you will be able to loosen the pin nails from the wood effectively.
Step 3: Removing The Pin Nails
To remove pin nails from wood, you can use needle-nose pliers. This tool allows you to grip and pull the pin nails without causing damage to the wood. When using the pliers, apply gentle pressure to securely grip the pin nail. Make sure to pull in the correct direction to minimize any potential damage to the wood surface. By following these steps, you can effectively remove pin nails and prepare the wood for any further projects or repairs. Remember to proceed with caution and take your time to ensure successful removal of the pin nails.
Step 4: Filling And Sanding The Nail Holes
To fill and sand the nail holes in wood, the first step is to select an appropriate filler material for the wood type. Wood putty, epoxy, or wood filler are commonly used options. Choose a filler that matches the color and grain of the wood for a seamless finish.
Apply the filler to the nail holes, ensuring that it is slightly overfilled. Use a putty knife or your finger to press the filler into the holes, ensuring it is level with the surface of the wood. Allow the filler to dry completely, according to the manufacturer’s instructions.
Once the filler is dry, you can proceed to sanding. Use a fine-grit sandpaper or sanding block to sand the filled areas. Sand in a circular motion, gradually smoothing the surface until it is level and blends with the surrounding wood.
Wipe away any sanding dust with a clean, damp cloth before finishing the wood as desired. This process will help ensure a professional-looking finish by removing pin nail holes and creating a smooth, even surface.
Step 5: Finishing Touches
To achieve a smooth finish on your wood project, sanding the filled pin nail holes is a crucial step. Begin by using a medium-grit sandpaper and sand in a circular motion, working on the area around the nail hole. Gradually switch to finer-grit sandpaper, such as 220-grit, for a more polished result. Pay attention to the sanded area to ensure it is level with the rest of the wood surface. Once you are satisfied with the smoothness, wipe away any dust with a clean cloth or tack cloth.
To seamlessly blend the filled nail holes with the wood’s appearance, staining or painting is the next step. Determine the type of finish used on your wood and select a matching stain or paint. Apply the stain or paint to the filled nail holes using a small brush or sponge, making sure to blend it evenly with the surrounding wood. Allow the finish to dry completely before applying any additional coats, if necessary. Sanding and staining or painting the filled pin nail holes will leave your wood project looking flawless.
Tips For Successful Pin Nail Removal
Using light and controlled force is essential when removing pin nails from wood to avoid damaging the wood. Here are some important tips to keep in mind:
- Work in a consistent and organized manner to ensure efficiency and prevent any potential accidents.
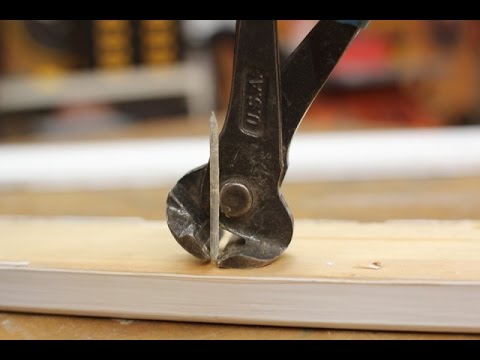
- Use a small pair of pliers or end-cutting pliers to grip the head of the pin nail.
- Apply gentle pressure while pulling the nail in a straight and steady motion.
- Avoid using excessive force or twisting the nail, as this can cause the pin to snap or damage the wood.
- If the pin nail is deeply embedded, try gently tapping it with a hammer to loosen it before pulling.
- Inspect the wood surface after removing each nail and use wood filler or putty to fill any holes if necessary.
By following these tips and being cautious throughout the process, you can successfully remove pin nails from wood without causing any damage.
Safety Precautions
When removing pin nails from wood, it is important to take certain safety precautions to avoid accidents and injuries. One of the most crucial steps is wearing safety glasses to protect your eyes from any flying debris. Pin nails can easily become dislodged and fly in unpredictable directions, posing a risk to your eyes. Additionally, maintaining proper hand placement is essential to prevent accidental injuries. Always ensure that your hands are positioned away from the path of the pin nail and any potential rebound. By following these safety measures, you can safely and effectively remove pin nails from wood without any harm to yourself or others.
Troubleshooting Common Pin Nail Removal Issues
If you encounter nail heads breaking off during removal, there are a few solutions you can try. First, ensure that you are using the appropriate tools for the job. A pair of needle nose pliers or a cat’s paw pry bar are common choices. Apply steady and controlled pressure when pulling out the pin nails, as too much force can cause them to break off. If you’re having difficulty accessing deeply embedded pin nails, you may need to use a drill to carefully create a small pilot hole next to the nail. This will allow you to insert the pliers or pry bar more easily. Remember to use protective eyewear and work in a well-lit area for safety. By following these steps, you can remove pin nails from wood with greater ease and efficiency.
Frequently Asked Questions For How To Remove Pin Nails From Wood
How Do You Remove Pin Nails From Wood Without Damaging The Surface?
To remove pin nails from wood without causing damage, use a pair of needle-nose pliers to grip the head of the nail and gently pull it out at a 45-degree angle. If the nail is stubborn, place a thin piece of scrap wood between the pliers and the surface for added protection.
What Is The Best Tool For Removing Pin Nails From Wood?
The best tool for removing pin nails from wood is a nail puller or pry bar. These tools are specifically designed to grip and remove nails without damaging the surrounding wood. Slide the tool under the nail head and apply leverage to gently pry it out.
Can I Use A Hammer To Remove Pin Nails From Wood?
While a hammer can be used to remove pin nails from wood, it is not the most recommended tool. The force applied by the hammer can often cause damage to the surrounding wood, leading to unsightly dents or splits. It is best to use a specialized nail puller or pry bar for this task.
Is It Necessary To Fill The Holes Left By Pin Nails?
Filling the holes left by pin nails is not strictly necessary, but it can improve the appearance of the wood surface. Use a wood filler that matches the color of the wood, apply it to the holes using a putty knife, and smooth it level with the surrounding area.
Sand and finish the wood as needed.
Conclusion
Removing pin nails from wood can be a daunting task, but with the right techniques, it can be done efficiently. By following these simple steps, you can safely and effectively remove pin nails without causing damage to the wood surface.
Remember to use the proper tools and always prioritize safety. With a little patience and practice, you’ll be able to remove pin nails like a pro. So go ahead and tackle your woodworking projects with confidence!

Leave a Reply