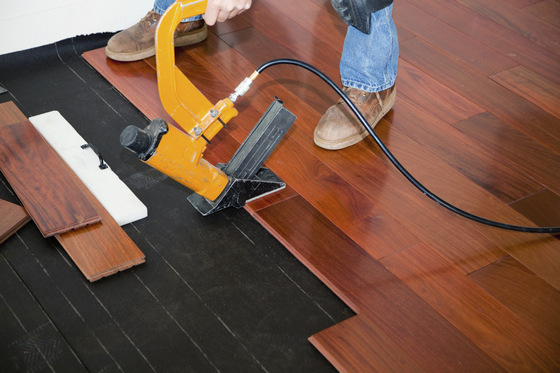
To nail hardwood floors, start by preparing the subfloor and laying down a vapor barrier. Then, measure and cut the hardwood boards, leaving room for expansion.
Next, position the boards and use a nail gun to secure them into the subfloor at a 45-degree angle. Finally, fill any nail holes with wood filler and sand the floor for a smooth finish.
Materials Needed For Nailing Hardwood Floor
- Hammer: A sturdy hammer is essential for nailing hardwood floors. Ensure it has a comfortable grip and is suitable for driving nails securely.
- Nails: Opt for high-quality, corrosion-resistant nails specifically designed for hardwood flooring. Different types of nails may be necessary for different floor thicknesses and subfloor materials.
- Hardwood flooring: Choose hardwood flooring that suits your style and budget. Consider factors such as species, grade, width, and finish options to achieve the desired aesthetic.
- Underlayment: Install underlayment to provide cushioning, reduce noise, and prevent moisture from reaching the hardwood floor. Choose underlayment materials suitable for your specific floor type.
- Measuring tape: Accuracy is crucial when installing hardwood floors. Use a measuring tape to determine the dimensions of the room, as well as the layout of the floorboards.
Ensure you have all the necessary materials before embarking on your hardwood flooring project. With the right tools at your disposal, nailing your hardwood floor will be both efficient and successful.
Preparing The Subfloor For Hardwood Floor Installation
Preparing the subfloor is a crucial step in successfully installing hardwood floors. One important aspect of this process is cleaning the subfloor to ensure it is free from any debris, dirt, or dust that could affect the floor’s adhesion. Use a broom, vacuum, or mop to thoroughly clean the surface.
The next step is checking for flatness. A flat subfloor is essential for a smooth and even hardwood floor installation. Use a long straightedge or level to check for any uneven areas. If you find any high spots or low areas, use a floor leveling compound to correct them. This will ensure a level surface for the hardwood planks.
Another aspect to consider is fixing any squeaks in the subfloor. Squeaky floors can be quite bothersome, especially once the hardwood is installed. Locate the areas that produce squeaking noises and secure the subfloor to the floor joists using screws or nails. This will help eliminate or reduce the squeaks.
Nailing Techniques For Hardwood Floor Installation
Proper nail placement is essential for a successful hardwood floor installation. The nails should be driven at an angle through the tongue of each plank, aiming towards the floor joists. This angle allows the nails to secure the planks firmly without damaging the surface.
When installing the first row, it’s important to leave a quarter-inch gap between the edge of the plank and the wall. This gap allows for natural expansion and contraction of the wood. As you continue with subsequent rows, make sure to stagger the end joints for added stability and a more appealing look.
The type and size of nails used for hardwood floor installation can vary. Common options include cleat and staple nails. Cleat nails are typically 2 inches long, while staples range from 1 to 2 inches in length.
The choice of nail size will depend on the thickness of the planks and the subfloor material. Thicker planks generally require longer nails to ensure proper penetration into the subfloor. It’s crucial to select the appropriate type and size of nails recommended by the flooring manufacturer to achieve optimal results.
Pre-drilling is an optional technique used to prevent the wood from splitting during installation. If you’re working with a particularly hard or dense hardwood species, pre-drilling can make it easier to insert the nails without damaging the planks.
To pre-drill, use a drill bit with a slightly smaller diameter than the nails. Carefully drill pilot holes at regular intervals along the tongue of each plank before securing them with nails. Remember to maintain the proper angle to ensure a secure installation without compromising the wood.
Nailing Hardwood Floor Installation Step By Step
Installing the first row:
- Start by measuring and marking the center line of the room, ensuring it is parallel to the longest wall. This will serve as a guide for the first row.
- Apply adhesive along the center line, then place the first plank on top, ensuring it is snugly fit.
- Use a flooring nailer at a 45-degree angle to securely attach the first row to the subfloor, ensuring each plank is tightly connected.
Securing subsequent rows:
- Begin the second row with a partial board to ensure a staggered layout, for added strength and stability.
- Use the flooring nailer to securely attach subsequent rows, making sure each plank is tightly snug against the previous row.
- For precision, consider using a rubber mallet to gently tap each plank into place before nailing.
Finishing the last row:
- Measure the remaining space for the last row and cut the planks to fit using a circular saw or table saw.
- Apply adhesive along the previously installed row, then place the cut planks and secure them with the flooring nailer.
- Ensure each plank is firmly attached, creating a seamless and secure final row.
Common Mistakes To Avoid When Nailing Hardwood Floor
Common Mistakes to Avoid When Nailing Hardwood Floor
Over-nailing: One common mistake to avoid when nailing hardwood floor is over-nailing. It is important to use the right amount of nails to secure the floorboards without causing any damage. Over-nailing can result in weakened floorboards and may even lead to splits or cracks.
Incorrect nail placement: Another mistake to steer clear of is incorrect nail placement. It is essential to place the nails in the correct locations to ensure the structural integrity and stability of the hardwood floor. Improper placement can cause the floorboards to become loose or cause unevenness in the surface.
Using the wrong nails: Lastly, using the wrong nails can be a costly error. Different flooring materials require specific nails for optimal results. Using the wrong type of nails can result in poor holding power and may cause damage to the hardwood floor in the long run. It is crucial to consult the manufacturer’s recommendations or seek professional advice to select the appropriate nails for your particular hardwood floor installation.

Credit: www.uptownfloors.com
Maintenance Tips For Nailed Hardwood Floors
Regular cleaning is essential to keep your nailed hardwood floors looking their best. Sweeping or vacuuming the floor on a regular basis helps to remove dust, dirt, and debris that can scratch the surface. Make sure to use a soft-bristle broom or a vacuum cleaner with a floor attachment to avoid scratching the wood.
Avoiding moisture damage is crucial for maintaining the longevity of your hardwood floors. Clean up spills immediately, as moisture can seep into the wood and cause it to warp or buckle. Place mats or rugs in high traffic areas, especially near entryways, to prevent dirt and moisture from being tracked onto the floor.
For added protection and to restore the luster of your nailed hardwood floors, consider polishing and refinishing them periodically. Follow the manufacturer’s guidelines for polishing products and techniques to ensure you achieve the best results.
By following these maintenance tips, you can keep your nailed hardwood floors looking beautiful and extend their lifespan.
Troubleshooting For Nailed Hardwood Floors
Maintaining a nailed hardwood floor may require some troubleshooting to keep it in top shape. Squeaky floors can be bothersome, but they can be sorted out with a few simple steps. Firstly, identifying the source of the squeak is essential. Walk across the floor and try to locate the spots where the noise is coming from. Once identified, sprinkle talcum powder or a specially designed squeak-reducing powder over the affected area, and then sweep it into the cracks.
Repairing loose nails is another common issue with nailed hardwood floors. A loose nail can easily be hammered back into place using a hammer and nail set. Make sure to hit the nail head well, so it becomes flush with the surface of the floor. Additionally, to eliminate gaps between planks, fill them with flexible wood filler and scrape off any excess once it dries.
Benefits Of Nailing Hardwood Floors
Hardwood floors are an excellent choice for homeowners seeking stability and durability in their flooring. Nailing hardwood floors offers several advantages, making it a cost-effective option for many. One of the primary benefits is the ability to replace damaged boards easily, ensuring a longer lifespan for the flooring. Whether due to wear and tear or accidental damage, the ability to replace individual boards reduces maintenance costs in the long run. Additionally, the stability provided by nailing hardwood floors reduces the risk of warping and shifting over time, resulting in a sturdy and reliable surface. This makes them particularly suitable for high-traffic areas in homes. Moreover, nailing hardwood floors also enhances the overall aesthetic appeal of a space, adding a touch of elegance and warmth to any room. Overall, nailing hardwood floors is a smart investment that can enhance the beauty and durability of your home.
Frequently Asked Questions For How To Nail Hardwood Floor
Should You Nail Or Glue Hardwood Floors?
Nailing or gluing hardwood floors depends on the type of flooring and the installation method. Nail-down installation is common for solid hardwood floors, while engineered hardwood can be nailed, glued, or floated. Consider the manufacturer’s recommendations and consult a professional for proper installation guidance.
What Kind Of Nails To Use On Hardwood Floors?
For hardwood floors, it is recommended to use “cleat nails. ” They are specifically designed for this purpose, offering a secure and durable hold. Cleat nails have ridges along the shaft, preventing them from backing out over time. Proper selection of nails is crucial to ensure the longevity and stability of your hardwood floors.
Do You Nail The Tongue Or Groove On Hardwood Flooring?
Nail the tongue on hardwood flooring for a secure fit. The tongue is the projecting edge of the plank that fits into the groove of the adjoining plank. By nailing the tongue, you ensure a tight and stable installation that prevents movement and gaps between the planks.
Can You Use A Regular Nail Gun For Hardwood Floors?
Yes, you can use a regular nail gun for hardwood floors. It’s important to choose the correct nail size and ensure proper placement to avoid damaging the wood. Always consult the manufacturer’s guidelines for your specific nail gun model.
Conclusion
To sum it up, nailing hardwood floors requires precision and attention to detail. By following the step-by-step process outlined in this blog post, you can achieve a flawless and durable flooring installation. Remember to choose the right materials, prepare the subfloor properly, and use the correct tools.
Additionally, regular maintenance and care will prolong the life and beauty of your hardwood floors. So go ahead, take your time, and enjoy the satisfaction of a job well done!


Leave a Reply